Mesh Growth script for Blender Sverchok

Overview
This entry shows some examples of Differential Mesh Growth, using a script in SNLite node in Blender Sverchok add-on.
Description
About a couple of month ago, I posted an entry to show an example of Differential Mesh Growth using Pulga Physics node and some other nodes.
However, the node tree became complex to make and it seemed difficult to manage the tree structure. So I decided to write a script to implement the algorithm and tried to reduce the task to make the node tree.
Luckily, Blender and Sverchok add-on already have useful APIs to achieve this attempt, such as relax_mesh and subdivision API. So it is not so difficult to write the growth algorithm. Just repeat some operations: relax mesh, subdivide mesh, and move vertices using forces between them.
In this entry, I will show some example of node trees to make growth simulation, not explain the details of the script. If you want to know about the script, please see my GitHub repository or visit links in the References at the bottom of this page.
Usage
Script for Differential mesh growth is in mesh_growth directory in my GitHub repository.
https://github.com/asahidari/differential_growth_snlite_b3d
mesh_growth/differential_mesh_growth.py
To use this, just load to the Script Node Lite node in Sverchok add-on. If you do not know how to load this script in Sverchok add-on, please see my previous entries.
SNLite node image is here.

- steps: Total frame steps.
- vertices_in: Mesh vertices
- edges_in: Mesh edges
- faces_in: Mesh polygons
- weights_in: Vertex weights
- random_seed: Random seed to make first velocities
- relax_iterations: Iteration count to relax mesh
- max_edge_length: Max distance between each vertices
- framenum: Frame number of output datas
Parameters (inside the script):

- SEPARATION_FORCE/DISTANCE: Separation parameters between each vertices. Ratio to the average edge length.
- MAX_VELOCITY: Max velocity of the vertices. If edges become larger than this value, the edges will be subdivided.
- COHESION_FORCE/DISTANCE: Cohesion parameters between each vertices.
- RELAX_WEIGHTED_ONLY: Apply relax mesh only for vertices whose weight values are larger than zero.
These parameters inside the script often affects the shape of the growth, so adjusting these values are also important to control the growth shape.
Example
These images are some examples of the node trees to make growth simulation. It is possible to make more various shapes if you change the source object and the parameters.
Growth from a disc


Growth from a torus


Growth from a part of a torus

References
Playing with Willmore Flow 1D in Blender using Sverchok add-on

Overview
This entry shows some examples of Willmore Flow 1D simulation in Blender, using SNLite node of Sverchok add-on. The script using in this entry is implemented following the paper about Willmore Flow by Keenan Crane et. al. and some references.
Though the curvature flow in this entry is just 1D version, there seems some ways to use the flow simulation.
Description
To learn about Willmore Flow and the mathematics of the flow, the best way is to read the thesis written by K. Crane et. al. So this blog will not describe the details of the flow. And if you want to know more about the flow, please read the paper and some references at the bottom of this page.
This implementation is based on the original thesis and some materials in references. (Though I found a link to Willmore Flow 1D tutorial In K. Crane's web page in cs.cmu.edu, I could not access the link page currently (Oct. 2021) due to some errors about Wordpress.)
When you can simulate the flow in Blender, the flow animation can be used in various ways, such as using it as a mesh boundary movement and deploying some objects or meshes along the curve.
Implementation
My code in GitHub is below. https://github.com/asahidari/curvature_flow_snlite_b3d
When I could not understand the details of the original paper, this javascript project in GitHub helped me.
This implementation is intended to be used for Script Node Lite (SNLite) node in Sverchok add-on. When the implementation can be used as a node, you can make various flow simulation with other nodes.
Rough algorithm is:
* Evaluate curvature.
* Pick a desired flow direction.
* Build a constrain basis.
* Project flow onto constraints.
* Take an explicit Euler step.
* Recover tangents.
* Recover positions.
GRAM-SCHMIDT orthogonalization is implemented like this, using numpy.linalg.qr function.
        def buildConstraints(self, nodes, f):
            x1 = np.ones(f.shape[0])
            x2 = nodes[:,0]
            x3 = nodes[:,1]
            A = np.stack((x1, x2, x3), axis=1)
            q, r = np.linalg.qr(A)

            f_ = f - np.sum(np.dot(f.T, q) * q, axis=1)

            return f_
Example
Examples in this chapter are made with Sverchok add-on and the SNLite node to load my script. If you want to know about Sverchok, visit the GitHub page. My previous posts also shows some usages of the node add-on.
Image below is the SNLite node when my script is loaded.

parameters:
* steps : The number of the total step.
* verts_in : Vertex list of the source object.
* time_step: 'dt' (Delta time) in each step.
* frame_num: Frame number of the generated frames.
* verts_out : Result vertices for the 'frame_num' frame.
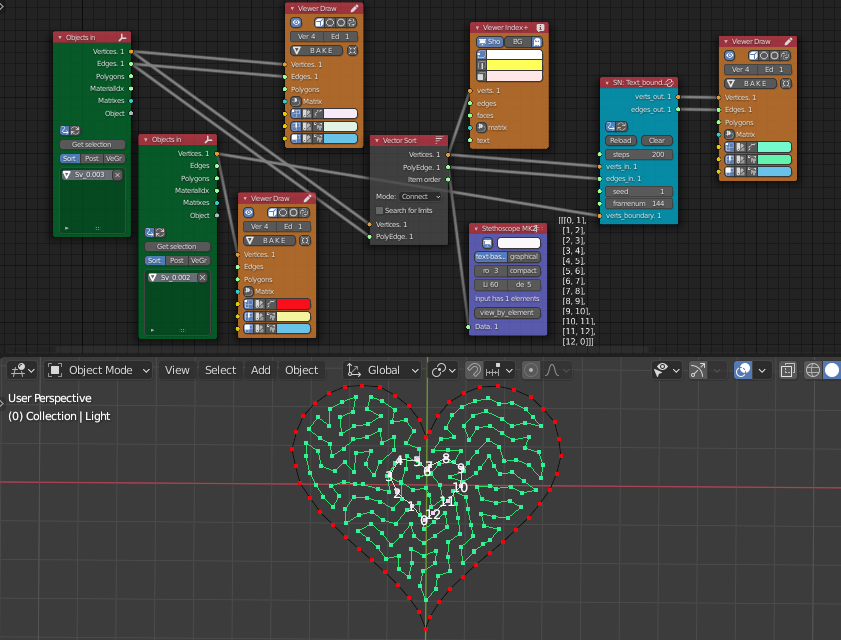
Chain movement along the curve

Node tree of this flow is below. When you change the 'framenum' parameter in the SNLite node, you can animate the flow.

Source object and the chain element is below. Chain object has two modifiers, array modifier and curve modifier, to fit the curve.


Using the curve as a mesh boundary

This node tree generates a '2D curve' object to fill the inside of the boundary.

Source object is this.


Extruding the curve to simulate cookie-cutter reshaping

This node tree makes a mesh with 'Extrude curve along vector' node to extrude along Z axis.

Source object is this.

Limitation
This implementation works well for many cases. But when you use curves which have complex shapes and many sharp curves, it sometimes generates results you do not expected (, usually the last edge often become longer).

When that occur, try to do some of the list below. Some of them might change your curvature flow.
* Rotate the vertices list to change the first vertex position.
* Reverse the order of the vertices list.
* Subdivide or un-subdivide the edges to change edge lengths.
* Change the parameter 'dt' to speed up or slow down the flow step.
(The unexpected results might be caused by some of misunderstanding in my script. If you find some mistakes in my script, please post the comment in my blog or twitter.)
References:
- Keenan Crane - Conformal Willmore Flow
- Curvature flow in curvature space - K. Lykov Blog
- Curvature Flow - Welcome
In Japanese:
* Tutorial - 1D Curvature Flow | Masahiro Hirano
* Willmoreエネルギーと閉曲面の正球化 - ryamadaのコンピュータ・数学メモ
Differential Mesh Growth in Blender with Sverchok add-on

Overview
This entry shows an attempt to implement differential mesh growth in Blender with Sverchok add-on.
Description
In my previous entry, I wrote about Differential Curve Growth on mesh with SNLite node in Sverchok. In this entry, instead of writing scripts, I'll show a node tree to generate Differential Mesh Growth.
At first, I tried to write scripts for the growth. But I found using existing nodes is easier than writing code, because the growth needs applying subdivision surface, relaxing mesh, etc. and writing these features from scratch is time consuming . So I decide to use nodes which are already included in Sverchok add-on.
Differential growth is already implemented with other apps (like Grasshopper, Houdini, etc.). I referred to the existing articles listed at the bottom of this entry.
Implementation
List below is the rough sketch of the algorithm to simulate Differential Mesh growth.
- Prepare a triangulated small mesh.
- Define the vertex weight values to decide which vertices grow more.
- Repeat the following processes.
- Relaxing mesh to keep triangles of the mesh nearly equilateral.
- Subdivide meshes which have long edges.
- Calculate forces to move vertices, using the weight values as feeds.
- Move vertices according to the forces.
I use a small triangulated hexagon as a source plane. You can use other surfaces but triangulation is mandatory.

This time, I simply use Euclid distances from center point as weight values. (Using geodesic distance will make more sophisticated results) The higher values the vertices have, the more they grow. . When the pattern of the weight distribution changes, the shape of the growth also changes.

Then, connect relax mesh node, subdivide node and pulga physics node.

After the tree node is generated, you can change frame by incrementing 'frame info' node's 'current frame' parameter. As the growth proceeded, the more time will need because the number of mesh increases.
When you want to reset the animation, change value 1 to 0 in 'number' node near the source 'object IN' nodes, and change it 0 to 1 again. (Before change the value 0 back to 1, you can clear the cache by changing 'frame info' node's 'current frame' once or twice)
This is an example of the growth results. When you change the parameters in Pulga Physics node and weight-value distribution pattern, you can get various growth shapes.
Update (November 9, 2021)
I wrote a script to integrate some node functions using in this entry. To use the script, visit the link below.
Mesh Growth script for Blender Sverchok - Kukan Kogei -空間工芸-
References
- On Generative Algorithms: Differential Mesh · inconvergent
- Floraform – an exploration of differential growth – Nervous System blog
- Differential Growth in Curves - Grasshopper
- Organic Modeling Techniques Part 2: Differential Growth | MATH/ART BLOG
- Mesh growth & Reaction Diffusion in SV · Issue #3384 · nortikin/sverchok · GitHub
Differential Growth on mesh using Sverchok SNLite in Blender
Overview
This entry shows how to process Differential Growth on mesh, using Sverchok SNLite node in Blender. This entry follows my blog's previous entry.
Description
In my previous entry, I wrote scripts to simulate Differential Growth on 2D space. Previously, the growth was on a 2d plane, but this time the growth on a mesh (or polygon). To get the growth on mesh, in addition to the previous algorithm, velocity vectors from each vertices have to stuck to the mesh, with the top point of the vectors ray-casted to the nearest point on the mesh.
To do this, I use mathutils.BVHTree.find_nearest API, no need to use ray_cast API. Calling this API for each vertices (or nodes of the growing line), the line can grow on mesh.

Usage
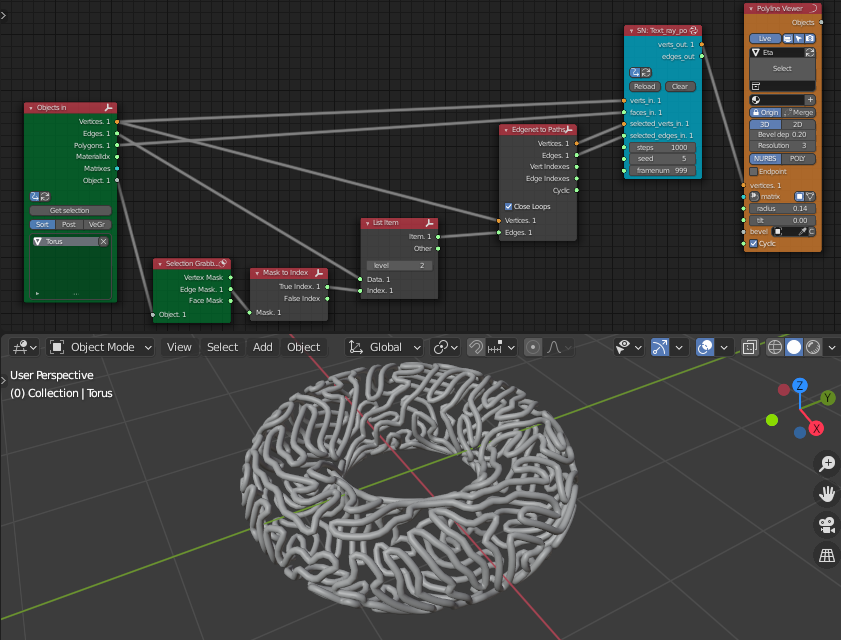
Script node image is here.

Input datas:
- verts_in: vertices of the source mesh
- faces_in: faces (polygons) of source the mesh
- selected_verts_in: selected vertices of source the mesh, starting points of the growth
- selected_edges_in: selected edges of source the mesh, starting edges of the growth
- steps: total steps of the growth
- seed: random seed to generate first velocity of the vertices
- framenum: frame number of the steps, which can change output verts/edges for each frames
Output datas:
- verts_out: vertices at the 'framenum' frame of the growth steps.
- edges_out: edges at the 'framenum' frame of the growth steps.
After all input datas are connected or 'Reload' button is clicked, calculation for all animation steps will run. Once the output datas are generated, you can select output datas by changing 'framenum' parameter.
If you can not get results you expected, you can also modify more detailed parameters in the script.

- COHESION FORCE/DISTANCE
- SEPARATION FORCE/DISTANCE
- MIN/MAX_VELOCITY
- MAX_LINE_LENGTH
Top image of this entry will show you how to connect this script node with other nodes.
Scripts
Scripts for Sverchok SNLite node is here. GitHub - asahidari/differential_growth_snlite_b3d: Differential Growth simulation with Sverchok SNLite node in Blender.
Example
Image below is the process of the growth on a torus surface. Node tree is described in the top image of this entry.

References
Differential line growth inside the boundary, using Blender Sverchok add-on

Overview
This entry shows the way to draw Differential line growth with 'ScriptNodeLite' node in Sverchok add-on for Blender. In addition to the normal growth, this attempt uses certain boundaries to restrict the expansion.
Description
This article mainly shows an implementation and usage of Differential line growth simulation using Sverchok add-on in Blender.
Differential line growth simulation is already implemented in other environments and with other codes, like inconvergent or code plastic. This entry is also inspired these sources.
And currently(Aug. 2021), In a Sverchok GitHub issue, Sverchok developers have already posted a node tree which can simulate Differential Growth with Pulga Physics node. Using Pulga Physics node seems better way than mine because you can see clearly how to realize the growth (, in a sense, my script is a kind of black box).
So, the script in this entry might be the 'reinventing the wheel'. However this script also has some merits, for example, you can do the growth with only one script node. I keep this post as a reminder if there is no problem.
In addition to implement the simulation, this includes another attempt, to restrict the growing shape with some boundaries.
Differential line growth can be implemented altering Bold model simulation of flocking birds. And when I read some certain Bold model implementation (Alife (in Japanese)), I found the growth can be restricted in certain areas.
Using this technique, you can generate various growth patterns.
Algorithm
- Divide long edges.
- Calculate cohesion and separation forces between vertices, and forces from boundary if exists.
- Sum up these forces to get each vertex velocities.
- Move the vertices with the velocities.
- Repeat this cycle.
Environment
This attempt requires:
* Blender 2.8 (or later)
* Sverchok add-on 0.6 (or later)
How to use
This simulation uses 'ScriptNodeLite' node in Sverchok.
To run this code,
- Open Blender's text editor
- Click '+New' button in the header to create new buffer.
- Copy and paste this script to the buffer.
- Enter the buffer name to the text box in 'ScriptNodeLite' node.
- Click the right button of the node.
After that, you can input original vertices and edges and boundary vertices (optional).

The original vertices and edges should be in a cyclic order and as small as possible.

Click 'Reload' button if you update the outputs.
To adjust more details, change the following parameters in code directly:
- COHESION_FORCE/DISTANCE
- SEPARATION_FORCE/DISTANCE
- BOUNDARY_FORCE/DISTANCE
- MIN/MAX_VELOCITY
- MAX_LINE_LENGTH
Tips to make good shape (from my experience):
- MAX_LINE_LENGTH should not be too long to avoid intersection.
- MAX_LINE_LENGTH should not be too small to avoid generating many vertices.
- At first, use small value to MAX_VELOCITY. And gradually increase it.
- Set SEPARATION DISTANCE between a half of MAX_LINE_LENGTH and MAX_LINE_LENGTH.
- If you cannot generate shapes you expect after these attempts, try to change COHESION_FORCE/DISTANCE.
Scripts
Scripts for SNLite node are in my GitHub repository.
GitHub - asahidari/differential_growth_snlite_b3d: Differential Growth simulation with Sverchok SNLite node in Blender.
Example
References
Reaction Diffusion using C code with Sverchok SNLite node in Blender

Overview
This entry describes Reaction Diffusion (RD) simulation in Blender, with C code using Sverchok ScriptNodeLite(SNLite) node.
Description
This aim is to enable RD simulation on Blender's node editor, not just to get RD's 3D models.
If you want to make RD 3D models, you can use Ready or Blender's Tissue add-on. And Jimmy Gunawan have useful tutorials like this or this.
When you try to write script for RD simulation and run in Blender, it needs huge amount of calculation and much amount of time. So it is not realistic to implement RD with only plain python. Sverchok add-on has tried to solve this problem with some techniques, such as using python's numba module with JIT compile.
Mesh growth & Reaction Diffusion in SV · Issue #3384 · nortikin/sverchok · GitHub
To use C library, this project is derived from my template project to run C code.
GitHub - asahidari/run_c_code_with_snlite_b3d: An example of running C code in Blender Sverchok add-on.
Using C code is not normal way for Blender's (and Sverchok's) scripting, and you need external compiler to build C library. So this technique is just experimental.
Scripts and files
Scripts and C codes are included in my GitHub repository.
GitHub - asahidari/ReactionDiffusion_SNLite_b3d: Reaction Diffusion simulation with Sverchok SNLite node and C codes in Blender.
Idea of these scripts are originated from @zeffi's gist and nortikin/sverchok#1734.
Files in this repository includes:
- BasicRD_2d
- BasicRD_2d.py : Drawing RD from a rectangle with C code
- BasicRD_2d.c : C code for BasicRD_2d.py
- BasicRD_3d
- BasicRD_3d.py : Drawing RD from a cube with C code
- BasicRD_3d.c : C code for BasicRD_3d.py
- BasicRD_3d_standalone.py : Drawing RD from a cube "without" C code
- RD_on_mesh
When you use "standalone" versions, these do not depend on any C libraries, but processing speeds are very slow.
How to use
Compile C code and make C dynamic library.
  :: Windows
  cl.exe /D_USRDLL /D_WINDLL Basic_RD_xd.c /MT /link /DLL /OUT:libBasic_RD_xd.dll
# macOS gcc -dynamiclib -o ./libBasic_RD_xd.dylib ./Basic_RD_xd.c# Linux gcc -c -fPIC Basic_RD_xd.c -o Basic_RD_xd.o gcc Basic_RD_xd.o -shared -o libBasic_RD_xd.so
Launch Blender and open Sverchok node editor.
- Add Script Node Lite (SNLite) node.
- Open Text editor in Blender.
- Copy and paste one of the Python script to the text buffer.
- Modify "load_library" arguments in the script to load your library (if you use "with C code" script).
- Write the the text buffer name to the node and click the right button.
Node Tree Examples
Regarding Basic_RD_2d example, see nortikin/sverchok#1734 .
Image below is a Basic_RD_3d example, using Meta ball for each output vertices.

Next image is an RD_on_mesh example, using the output for vertex colors.

References
Run external C code with Sverchok SNLite node in Blender

Overview
This entry describes how to run external C/C++ code in Blender, using Sverchok's Script Node Lite (SNLite). You can also use this approach with only Blender python without Sverchok. But if you use the add-on, you may write fewer codes and put the outputs into other nodes.
Blender requires add-ons not to include binary files like dll. So this approach cannot used to make add-ons. But this approach may extend the capability of Blender's scripting. When you do tasks that need large amount of calculation and high performance, such as implementing Machine learning, Fractals and Reaction Diffusion, this technique will be some help.
Required Environments
In this approach, these tools or modules will be needed.
- Blender and Sverchok add-on
- Python's ctypes or numpy/ctypeslib module (Blender's python already has them.)
- Precompiled C/C++ dynamic libraries(If you do not need to modify them.)
- C/C++ Compiler or IDE (If you need to build your custom C/C++ library.)
You can also use Cython to run C code. Both Ctypes and Cython have pros and cons. But if you have pre-compiled library, you do not have to compile C/C++ library. So in this blog, I will use ctypes (and numpy/ctypeslib).
Current Sverchok's approach (July, 2021)
Sverchok developers already recognized the possibility to use external C/C++ code using SNLite.
Interesting external dependencies to play with (discussion) · Issue #2152 · nortikin/sverchok · GitHub
But as mentioned above, Blender's add-on should not include binaries. They probably has been exploring the way to do high performance tasks without using C/C++ libraries and Cython. Currently, using Python's numba library,JIT(Just in time) compiler , is possible candidate. I hope this approach work well.
Can we use Numba?... · Issue #2646 · nortikin/sverchok · GitHub
add numba dependency by zeffii · Pull Request #4209 · nortikin/sverchok · GitHub
A simple example to use a C library
Script and code below is included in my GitHub repository.
GitHub - asahidari/run_c_code_with_snlite_b3d: An example of running C code in Blender Sverchok add-on.
This example simply multiply x/y/z values of all vertices, and generate results for all drawing steps. Using 'setup' function can provide this behavior, because 'setup' function can behaves like Processing 'setup'.
I learned this pattern by reading the issue below in Sverchok project in GitHub.
Reaction Diffusion script. · Issue #1734 · nortikin/sverchok · GitHub
C code:
#include <stdlib.h>

// declare callback function type
typedef void _callback_func(int step, int dim1, int dim2, double* ppArray, void* pObj);

// process method to multiply vertex-coordinates with scale value in each step
int process(int num_steps, double scale, int dim1, int dim2, double** verts, _callback_func cb_func, void* pObj) {

    if (verts == NULL) {
        return -1;
    }

    // Allocate buffer
    double* pBuff = (double*)malloc(sizeof(double) * dim1 * dim2);

    //  set initial value to the buffer
    for (int i = 0; i < dim1; i++) {
        for (int j = 0; j < dim2; j++) {
            pBuff[i*dim2 + j] = verts[i][j];
        }
    }

    for (int s = 0; s < num_steps; s++) {

        // multiply element values in each step
        for (int i = 0; i < dim1; i++) {
            for (int j = 0; j < dim2; j++) {
                pBuff[i*dim2 + j] *= scale;
            }
        }

        // call the callback function to pass the parameters
        if (cb_func != NULL) {
            cb_func(s, dim1, dim2, pBuff, pObj);
        }
    }

    // Release buffer
    free(pBuff);

    return 0;
}
Python code:
"""
in steps s d=10 n=2
in verts_in v
in scale s d=2.0 n=2
in framenum s d=0 n=2
out verts_out v
"""

def setup():

    import numpy as np
    import numpy.ctypeslib as npct
    import os
    import ctypes as ct

    def callback_func(step, dim1, dim2, data, selfp):

        # convert array type from c to numpy
        verts_arr = npct.as_array(ct.POINTER(ct.c_double).from_address(ct.addressof(data)), shape=(dim1, dim2))
        arr_stored = verts_arr.tolist()

        # call class method using self pointer
        instance = ct.cast(selfp, ct.py_object).value
        instance.store_frame(step, arr_stored)

    # class declaration
    # Derived from ctype.Structure to pass self pointer to c function
    class CMultiply(ct.Structure):

        def __init__(self, steps=10, scale=2.0, verts=None):

            self.frame_storage = {}
            if verts == None:
                return;

            # declare callback function c type
            c_arr_type = np.ctypeslib.ndpointer(dtype=ct.c_double, flags='C_CONTIGUOUS')
            callback_func_type = ct.CFUNCTYPE(None, ct.c_int, ct.c_int, ct.c_int, c_arr_type, ct.c_void_p)

            # load library
            libscale_verts = npct.load_library('libscale_verts', os.path.dirname('/Path/to/the/library/directory/'))

            # declare argtypes and restype
            libscale_verts.process.argtypes = [
               ct.c_int, # step count
               ct.c_double, # scale value
               ct.c_int, # array dimension1
               ct.c_int, # array dimension2
               npct.ndpointer(dtype=np.uintp, ndim=1, flags='C'), # verts array
               callback_func_type, # callback func
               ct.py_object # self
               ]
            libscale_verts.process.restype = ct.c_int

            # convert array type
            verts_arr = np.array(verts)
            verts_arr_ptr = (verts_arr.__array_interface__['data'][0] + np.arange(verts_arr.shape[0])*verts_arr.strides[0]).astype(np.uintp)

            # call c function
            dim1, dim2 = verts_arr.shape[0], verts_arr.shape[1]
            res = libscale_verts.process(steps, scale, dim1, dim2, verts_arr_ptr, callback_func_type(callback_func), ct.py_object(self))

        # get frame
        def get_frame(self, number):
            return self.frame_storage.get(number) if number in self.frame_storage else []

        # store frame
        def store_frame(self, framestep, data):
            self.frame_storage[framestep] = data

    # instantiate main class
    cm = CMultiply(steps, scale, (verts_in[0] if verts_in is not None else None))

# set results per frame
verts_array = cm.get_frame(framenum)
verts_out.append(verts_array)
How to use
To use these scripts,
Compile c code to make a dynamic library.
  :: Windows
  cl.exe /D_USRDLL /D_WINDLL scale_verts.c /MT /link /DLL /OUT:libscale_verts.dll
# macOS gcc -dynamiclib -o ./libscale_verts.dylib ./scale_verts.c# Linux gcc -c -fPIC scale_verts.c -o scale_verts.o gcc scale_verts.o -shared -o libscale_verts.so
Click '+New' button of Blender's text editor and click '+New' to create a text buffer.
- Copy and paste this Python code into the text buffer.
Write the library path to the "load_library" argument in the python code.
          # load library
          libscale_verts = npct.load_library('libscale_verts', os.path.dirname('/Path/to/the/library/directory/'))
Open Sverchok node editor and create Script Node Lite (SNLite) node.
- Write the text buffer name (default is 'Text') to the SNLite node text box and click the right button in the node.
- Input some mesh vertices to the SNLite node and connect the output to a ViewerDraw node.
- Change 'framenum' value of the SNLite node to draw the results of each step.
I recommend to launch Blender from command line to see debug code in your terminal. Link page below is how to launch Blender from command line.
Launching from the Command Line — Blender Manual

What this project is used for?
This project is intended to be used as a template for projects using other C/C++ codes in Blender. This script includes the ways to load C library, to pass array between Python and C, and to use a python class method as a callback function. When you want to run other external C/C++ library in Blender or other Python environments, this project files may be some help.
I made a Reaction Diffusion simulation codes from this project. Top image of this page (Reaction Diffusion with a cube) is generated using the project below.
GitHub - asahidari/ReactionDiffusion_SNLite_b3d: Reaction Diffusion simulation with Sverchok SNLite node and C codes in Blender.
References
About Ctypes
ctypes — A foreign function library for Python — Python 3.9.6 documentation
C-Types Foreign Function Interface (numpy.ctypeslib) — NumPy v1.21 Manual
Python ctypes: loading DLL from from a relative path - Stack Overflow
How can I unload a DLL using ctypes in Python? - Stack Overflow
Cookbook/Ctypes - SciPy wiki dump
executing C code from python (windows) · Issue #4 · zeffii/BlenderPythonRecipes · GitHub
executing C code from python (passing and receiving arrays) · Issue #5 · zeffii/BlenderPythonRecipes · GitHub
Building dynamic libraries
1.4. Building a Dynamic Library from the Command Line - C++ Cookbook [Book]
c - How to build a DLL from the command line in Windows using MSVC - Stack Overflow
Shared libraries with GCC on Linux - Cprogramming.com
Build dylib on Mac os x